Wednesday, October 12, 2016

Bakarkhani/ Baqerkhani (A basic recipe)

A Mughlai delicacy, luxuriously rich and tasty, Bakarkhani is an Indian flat bread which has a hard crust and bread like or layered inside. There are many, many versions of Bakarkhani and this recipe is of the basic Bakarkhani which is modified to a slightly healthier version of the original recipe.


Bakarkhani originated in Bangladesh and has evolved into many variations including the saffron infused ones to the sweetish dessert types. The original Bakarkhani is made of flour, Milk, yeast, sugar and ghee with some sprinkled nuts and raisins. The famous version of Bakarkhani is the Kashmiri Bakarkahni which is sweet, rich and deliciously tasty. Anyway, I have adapted this recipe from Sanjeev Kapoor's  website since it was the easiest recipe I found.

This post is a part of Culinary Blog Hoppers monthly Blog hop and the theme is Indian Flat breads. I chose Bakarkhani since it seemed so very unique and yet so familiar. Though I have never tasted Bakarkhani, I have read a lot about these flat breads and wanted to attempt it at least once. I'm sure what i have presented here is not perfect since the original ones are more flatter and look much like flat breads than anything like I have made. But I am posting here nonetheless hoping that you would like my modified version too.


After my last post that I posted a month back, I have realized that no matter how much you are drawn to your passion and hobbies and try to make time for them, you always give up eventually when your family needs you more than your mind heart needs your passion for hobby. You know, I just confused myself with what I just wrote and yet, I'm not able to change anything in the lines above. Anyhow, here I am with another recipe which I'm sure is not perfect and yet hoping you would forgive the imperfection of this post and the delays in my posts.

Nutritional Information  (Approx) (per serving)
Energy  155 Calories
Fat 2 %
Carbohydrates 30.4 %
Dietary Fiber 0.8 %
Sodium 86.6 mg
Vitamin A 2.6 %
Vitamin C 0.6 %
Calcium  4.5 %
Iron  0.2 %
Protein 4.9 Grams
Sugar 4.5 Grams


Ingredients 
Plain flor/ Maida 2 cups
Milk 1 and 1/4 cup
Yeast 1 tablespoon
Brown sugar/ Sugar 2 tablespoons
Salt a pinch
Baking powder 1/2 teaspoon
Ghee 4 tablespoons
Almonds a handful
Chironji seeds a handful
Raisins a handful
Elaichi powder 1/4 teaspoon


Dissolve the brown sugar in warm milk. Add dry active yeast, mix well and let it rest so that the yeast can get active.


Warm some water and add Chironji seeds and raisins. Set them aside to soak for 10 mins.
Sieve together Flour, salt and Baking powder. Pour in the yeast and milk mixture, add elaici powder and mix.


Using your hand, mix the flour to form a firm dough. Let it aside covered in wet muslin cloth for 10 minutes.
Add melted ghee little by little and start kneading the dough.


Knead the dough till it is smooth and even textured all over. It takes about 10 minutes.
Now, blanch a handful of almonds and peel the skin off. Slice them and keep aside.
Drain water and add the soaked chironji and raisins along with sliced almonds to the kneaded dough and mix well. You may have to knead it for few more minutes.


Once the nuts and raisins are mixed well into the dough, set the dough in a warm place to raise for about 30 minutes.
Divide the dough into small balls (of your desired size) and flatten them one by one. I did not flatten them enough since I wanted them a little fluffy and bread-like and not the biscuit-like texture.
Prick the spread dough with a fork or tooth pick
Bake in a prheated over or tandoori oven for 15-20 minutes till the color of the crust turns brown and gets hard.


* The breads should be flatter so if you are attempting this, please do flatten the dough.
* For sweeter version, just replace brown sugar with 4 tablespoons of white sugar.
* For more rich taste, you can brush butter once the Bakarkhanis are baked and hot.
* Serve hot with curries
* If using tandoori oven, you don't have to add baking powder.

Do check out more of the amazing Indian flat breads presented by my fellow hoppers:

Tawa Aloo Kulcha by Piyali
http://mytrystwithfoodandtravel.blogspot.in/2016/10/tava-aloo-kulcha-recipe-stuffed.html

Restaurant style Roti by Jayashree
http://www.evergreendishes.com/recipe/restaurant-style-roti/

Schezwan Paratha by Shubha
http://www.shubhaskitchen.com/2016/10/schezwan-parata.html

Zucchini Paratha by Padma
http://www.masalakorb.com/zucchini-paratha-easy-indian-flatbread/%0A#flatbreads


Tuesday, September 13, 2016

Chocolate Mud Cake with Chocolate Ganache

Dense like a fudge, deliciously moist, super rich and chocolaty, Chocolate Mud cake is a definite hit among any cakes or desserts and truly satisfying for intense chocolate flavor lovers. The chocolate ganache is just perfect as filling and the topping which is finger licking good and makes this cake more desirable.


Chocolate cake is always at the top of the list of my weekend cheat day cravings and my first choice for any birthdays in my family. I was hoping for Naveen to choose this cake for his birthday when I asked what cake he wanted me to bake for his birthday and that was more than a month ago. He loved the combination of creamy and bittersweet chocolate ganache with a chocolaty mud cake.

It is the time for our usual Culinary hoppers monthly Blog hop and the topic is my favorite, favorite baked dishes. I did make a specific dish (Dilkhush) but felt that it is way too simple and scraped the post off. Anyway, I used this recipe for a perfect Mud cake adapted from www.chelsea.co.nz which is very easy and goes very well with dark chocolate ganache.

One thing I learnt about kids after having one of my own is, even though they don't hear you calling their names 100 times a metre away, they can hear you opening a chocolate wrapper in kitchen even if they are locked in a room! (Came across a post that said the same which made me realise that it is so true). My little beast comes running to the fridge as soon as she hears the sound of my Amul dark chocolate wrapper and watches eagerly while I reluctantly cut her a piece. Since chocolate ganache I made did not contain anything else but fine dark chocolate and Amul heavy cream, I did let her eat a huge chunk of the cake (which I regretted in just over 30 seconds!) and she happily smeared it all over her face, body and the floor. It took me more than 20 minutes to clean her up and the mess she made. So unlike me, she looked very satisfied and peaceful.


If you are looking for a blissful chocolate experience, do use good quality dark chocolate and not a chocolate compound. If you are looking for an egg-less version, just skip egg and add 1/4 cup of buttermilk/Yogurt. Please excuse the clumsy piping decoration since I am very weak at it. Hoping that you guys will like it as much as I did, here is the recipe for a classic chocolate mud cake with Chocolate Ganache.

Ingredients (For Mud cake)
Plain flour/ Maida 2 cups
Cocoa powder 1/4 cup
Brown sugar/ Sugar 1 cup
Salt  a pinch
Baking Powder  1 teaspoon
Baking soda 1 teaspoon
Lemon juice of half a lemon
Milk 1 cup
Dark chocolate  250 grams
Freshly brewed coffee decauction 1 cup
Cooking oil 1/2 cup
Egg (optional) 1
Ingredients (For Chocolate Ganache)
Dark chocolate 400 grams
Heavy cream 1 cup


Method: Mud cake


Sieve together Plain flour, Salt, baking Powder and Baking soda. Add sugar, cocoa and mix well.
For a cup of milk, add lemon juice and set it aside. In a sauce pan, Mix together coffee, Grated dark Chocolate, oil and egg. Heat under low flame till the chocolate is melted completely and keep stirring.
Once the mixture looks smooth, add the milk and lemon juice mixture, mix and set it aside to cool.


Once the mixture is warm, add it to the dry ingredients, mix well.
Preheat the oven to 180 degrees. Grease and line the cake tins and Pour the batter into them. Tap them to lose the bubbles.
Bake for 35 minutes at 180 degrees and for 5 minutes in 160 degrees. Once baked, let them cool completely before removing them out of the tins.

* Baking time varies in each oven so make sure to check the cakes if they are cooked after 25 minutes.


This is how good the cake comes out. Just so yumm!!


Method: Chocolate Ganache


Grate the chocolate and keep it aside. In a thick bottomed vessel, heat the cream under low flame till it is hot and not boiling. Pour the hot cream over the grated chocolate and let it rest for 15 minutes.
After 15 minutes, stir and mix well till the ganache is smooth.


If you want to glaze the cake, you can pour this hot mixture over your cake for a beautiful chocolate glaze.
To thicken the ganache for filling, let it rest overnight. Keep it covered with a cling wrap.


I have also cut the tops of the cakes and frozen them overnight. To assemble the cake, keep the bottom of the cake on a pre-lined base and pour little sugar syrup. This step is completely optional and I have used coffee to make the cake moist.
Now, fill with Ganache, place the top half of cake and decorate it as per your wish.


* Sorry for such a lengthy post but I hope I have covered everything as much as I could.
*  For an egg-less version, just skip egg and add 1/4 cup of buttermilk/Yogurt.
* Baking time varies in each oven so make sure to check the cakes if they are cooked after 25 minutes.
* Making the cake moist with sugar syrup or coffee is completely optional. The coffee syrup made the cake more bitter-sweet and we loved it that way.
* I coated my cake with the thickened ganache first and then made some hot ganache to pour over it before I piped whipping cream.

Please do check out all these amazing baked goodies from my fellow bloggers:

Jalapeno Cheddar Corn bread by Parvathy
http://crackleandtemper.ca/jalapeno-cheddar-cornbread-eggless/

Masala Khara biscuits by Marudhus Kitchen ,Vani
http://marudhuskitchen.com/www/chilli-biscuits-savoury-cookieschilimasala-khara-biscuits/

Eggless Ladi Pav by Padma
http://www.masalakorb.com/eggless-ladi-pav-bread-buns-recipe-mumbai-pav-rolls/

Simple Cocoa Brownies by Swati
http://www.letscookhealthytonight.com/simple-cocoa-brownies/

Naan Khatai by Jayashree
http://www.evergreendishes.com/recipe/nan-katai-biscuits/


Tuesday, August 30, 2016

Coconut Laddoo/ Coconut Laadu/ Coconut Laddu ~~Festival recipes

A delicious creamy dessert, a perfect offering for festivals, Coconut laddus can be prepared within minutes with very few ingredients and definitely makes you lick your lips wanting for more!


Shree Krishna Janmashtami is very special to me since I am attached to Lord Krishna and his teachings from my childhood and have always held him close to my heart and belief. Every year, even though our family does not celebrate it with more than a regular Pooja and preparing some simple payasa, I make sure I prepare all the delicious treats I can think of and make it a grand event. This year, I decided to stick to the desserts and dishes I can prepare quickly and easily. This is one of those recipes I made for this Janmashtami and it was simply delicious.

Since it has been ages since I stopped posting regularly, I have now decided to write up as many posts as I can and let them be in the drafts so that I can post them as and when I like. Anyway, Ganesha Chaturthi is just around the corner and I found this post apt for the occasion.

The recipe is very simple with just 3 ingredients and does not take more than 15 minutes to cook. If you do not have condensed milk, just replace it with a cup of powdered sugar and half a cup of thick milk, bring it to boil and then add coconut.I have used 2 whole coconuts which came up to 2 cups + 1/2 cup when grated and the recipe makes about 20 laddoos. Change the quantities accordingly.

Nutritional Information  (Approx) (per serving)
Energy  68.5 Calories
Fat 4.6 %
Carbohydrates 6.4 %
Dietary Fiber 1.1 %
Sodium 10.4 mg
Vitamin A 0.4 %
Vitamin C 0.7 %
Calcium  2.2 %
Iron  1.6 %
Protein 1 Grams
Sugar 5.3 Grams


Ingredients 
Desicated/Grated coconut 2 cups + 1/2 cup
Condensed milk 1 cup
Cardamom powder 1 teaspoon


If using fresh coconut, dry roast it on medium heat for about 10 minutes till the coconut doesn't seem soggy. Keep stirring so that the color of the coconut doesn't change. Keep it aside to cool down completely.If using ready made coconut powder, skip this step.
Once the coconut has cooled down, Grind it coarsely and separate half a cup and set it aside to coat the laddoos later.
Heat a kadai and add a cup of condensed milk. Keep the flame medium and let the condensed milk get heated up.


Add 2 cups of the ground coconut and mix well. Stir every 2 minutes and keep the flame in low. Cook for 10 minutes and keep stirring every 2 minutes. After 10 minutes, add elaichi/cardamom powder, mix well.


Once the mixture starts to leave sides, remove from flame and let the mixture cool down. When the mixture has cooled down to a temperature that you can touch, make small balls and cover with grated coconut till the ball is well coated. Cool the laddoos completely and serve.


* If you do not have condensed milk, just replace it with a cup of powdered sugar and half a cup of thick milk, bring it to boil and then add coconut.I have used 2 whole coconuts which came up to 2 cups + 1/2 cup when grated and the recipe makes about 20 laddoos. Change the quantities accordingly.
* If refregerated, the ladoos can stay up to 3 weeks.
* The laddoos taste mildly sweet so if you want it sweeter, just add 2 tablespoons of powdered sugar and 2 tablespoons of milk.
* You can also add nuts and dry fruits at the end but fry them in ghee before adding.

Wednesday, August 10, 2016

Crispy Baked Samosa with Mint & Coriander chutney

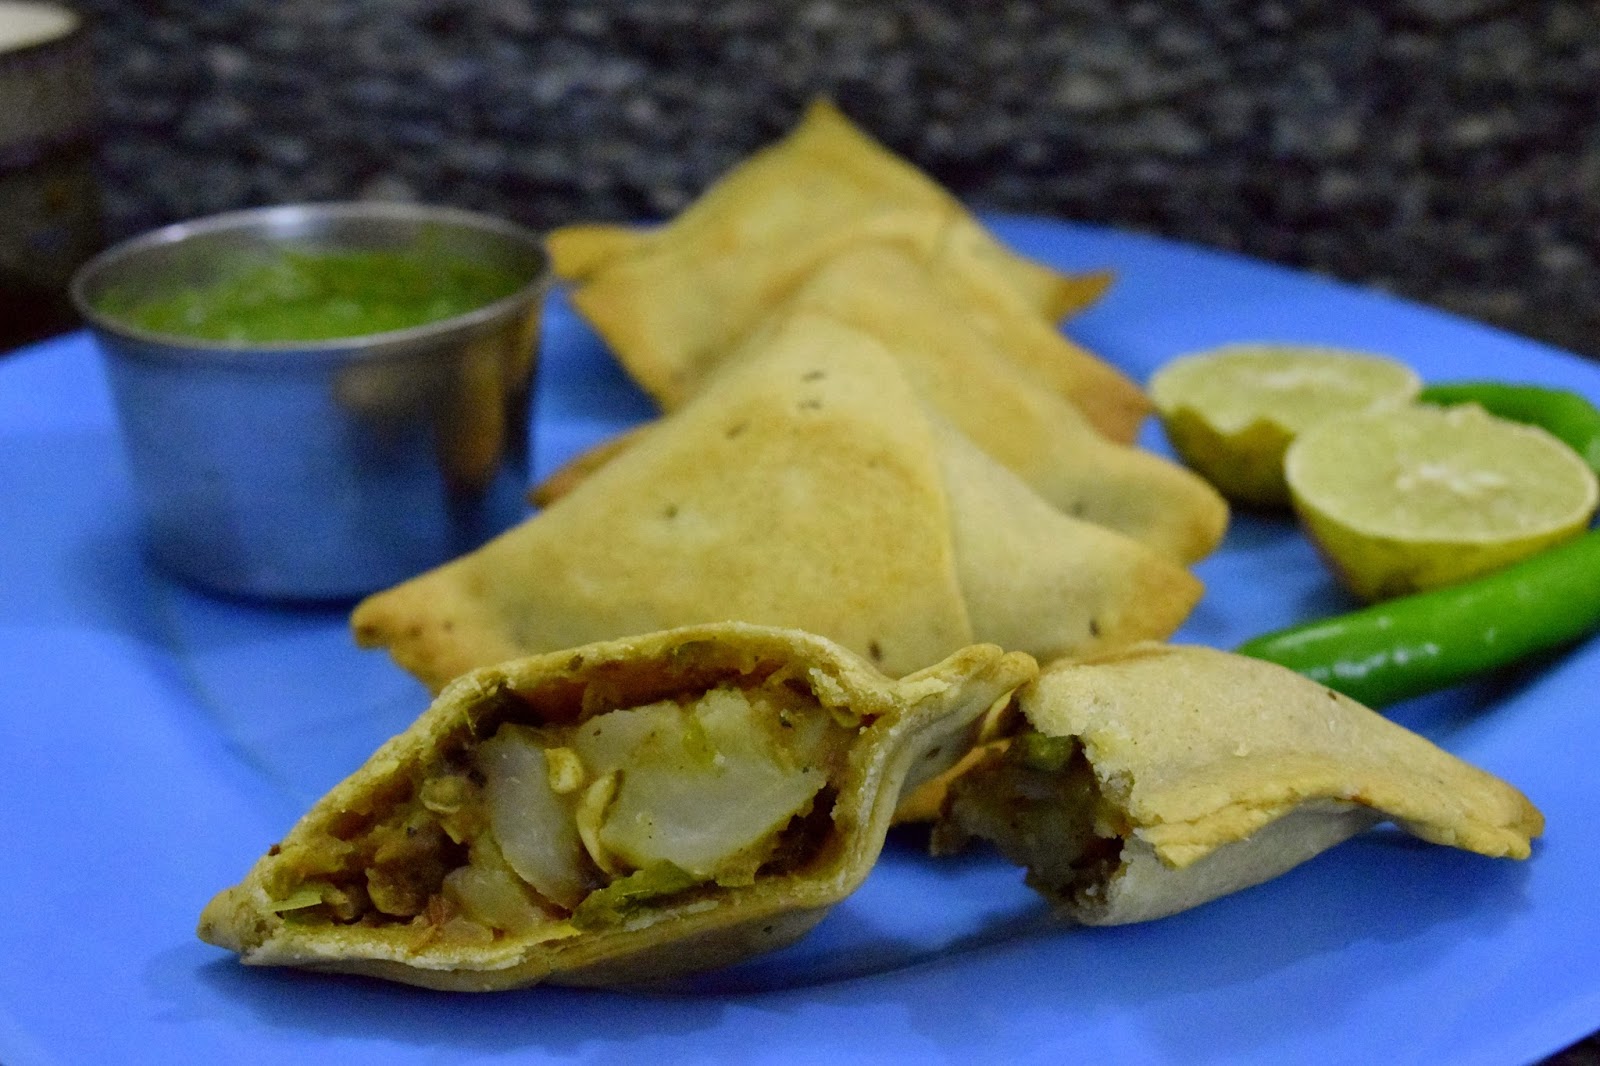
Delicious potato and peas stuffing wrapped in crispy and crunchy whole wheat pocket, these baked Samosas are a healthy and tasty replacement for the deep fried ones. It is a great snack for those who love samosas and yet want to eat healthy and not deviate from their weight loss plan/diet.


Traditional samosas are made of Maida wrappers filled with potato and green peas stuffing. They are deep fried and served with a spicy chutney. For health freaks like me, one traditional samosa = Calories for a whole day! I have been making my version of these healthy baked samosas from past 4 years and have never craved for the deep fried even once.. My version of samosa is made of whole wheat flour + semolina wrappers stuffed with potato, green peas and mixed veggie filling that is healthy and nutritious.

This month's bloghop being dishes made of Potato, my intial choice was Baked Tater tots. Tater tots are very easy and perfectly apt for my less time consuming post. However, I found a little bit of time yesterday as soon as baby slept and decided to make Samosas. During my college days My best friend Raghu and I used to roam around Jayanagar 4th block complex and devour the chats. We used to eat Gol gappas and Samosas from the same vendor every day for almost 3 years. Gone are the days when I could binge on fried goodies and desserts and not put on a gram more than I weighed. So, when i thought about making Samosas, I knew it would be either baked or shallow fried. How on earth can I shallow fry Samosas? So decided that they would be baked.

To know if anyone has attenpted baking Samosas instaed of deep frying, I browsed through google and the first result that came up was the amazing recipe for Punjabi samosas from veg recipes of india I went through it and loved how Dassana Amit had used homemade masala for the stuffing. I have always used homemade Garam masala which I make by dry roasting all the spices that I can get my hands on, powdered and stored in an airtight container. Even though my recipe is sparingly adapted from veg recipes of india, the recipe is standard Punjabi Samosa recipe. After keeping the samosas for baking, I realized that the Mint & coriander chutney Piyali had made a few days back would make a perfect side for these crispy Samosas. The chutney that I usually make is pretty similar to what Piyu posted, hope you guys like it.


You can deep fry the samosas if you don't mind the fried version and add chopped carrots and other veggies to make it a vegetable samosa. Baked Samosas taste no less delicious than the deep fried ones except it is totally guilt free. I have kneaded the dough with a little olive oil and hence brushing the wrap while sealing the ends is not needed. Also, adding half ghee and half butter to the dough makes the pastry dough more flaky and amazingly tasty and crispy. Here's my version of a guilt free, crispy, tasty\and healthy Samosa recipe.

Nutritional Information  (Approx) (per serving)
Energy  115 Calories
Fat 1.5 %
Carbohydrates 22.8 %
Dietary Fiber 2.5 %
Sodium 6.1 mg
Vitamin A 2.4 %
Vitamin C 8.6 %
Calcium  0.6 %
Iron  3 %
Protein 3.6 Grams
Sugar 0.2 Grams


Ingredients 
For the dough (Makes 10 Samosas)
Whole wheat flour 2 cups
Fine semolina 1 cup
Salt 1/2 teaspoon
Ghee + Butter 1/4 cup
Olive oil/ Any cooking oil 1 tablespoon
Carom seeds 1 teaspoon
For Stuffing
Potatoes (Large) 4
Frozen peas 1/2 cup
Onion 1 large
Ginger 1 inch
Garlic 4 to 5 cloves
Green chillies 2
Oil 1 teaspoon
Cumin seeds 1/2 teaspoon
Garam masala powder 1 teaspoon
Chilli powder  1/2 teaspoon
Amchur powder 1/2 teaspoon
Salt as needed
For Mint & Coriander chutney
Mint leaves a handful
Coriander leaves  a handful
Salt as needed
Water 2 to 3 tablespoons
Lemon juice  of half a lemon
Ginger 3 pieces
Garlic 4 to 5 cloves
Green chilli 1


Wash and chop the potatoes. Steam the potatoes with Green peas and set it aside.
In a bowl, mix whole wheat flour, semolina, salt and carom seeds. Add Ghee, butter and mix well using your fingers .


Now add water 1 tablespoon at a time and knead the dough well. Once the dough comes together, add the olive oil or any cooking oil and knead the dough for about 10 minutes. Cover the dough with a wet muslin cloth and let it rest while we prepare for stuffing.
Make a paste of green chillies, ginger and garlic and set it aside.


Peel the potatoes and mash them a little so that the lumps still remain. In a pan, heat oil, add cumin seeds and asafoetida. Add the green chilli ginger garlic paste and fry till the raw garlic smell goes away. Add chopped onion and fry till it turns translucent.


Add green peas and fry for a minute. Then add salt, garam masala, chilli powder, amchur powder and mix well.
Then add the potato mash and mix. Cook for 2-3 minutes and switch off the flame. Add coriander leaves and set it aside till the dough is ready.


Knead for 5 minutes and divide the dough into medium size balls and let it covered in wet cloth while you roll the dough into a chapathi. Let the chapathi not be too thick or too thin. Cut the chapathi in the middle as shown in the picture using a knife or a pizza cutter.
Bring the sides of the chapathi together to make it a cone like wrap and press the dough to seal it. Seat the tip of the wrap neatly. If the dough has enough oil and is kneaded well, the seal won't open while the samosas are getting baked.


Fill the wrap wil 2 teaspoons of potato stuffing and press the sides together to seal it as shown in the picture. Keep all the wrapped samosas under a wet muslin cloth. Preheat the oven to 200 degrees for 5 minutes while you get the baking plate lined and greased. Arrange the samosas on baking plate and bake for 15 minutes on each side.

Mint and Coriander Chutney


A tangy, minty and spicy chutney that is an absolutely perfect match made in heaven for delicious Samosas. My baked samosas tasted heavenly when dipped in this wonderfully tasty and addictive chutney. With all the added Ginger and garlic with mint and coriander combination, this chutney when eaten with Samosas balances the taste and prevents from developing gas and acidity because of the potato and green peas in samosas.

I had to uncover the mint leaves and coriander leaves that were still alive among the mess since I came home from my mom's place after staying there for a week. Anyway, as the quote ""Äll is well that ends well" proved in this case and I was able to put up a palatable chutney that married well with the samosas.


Clean and wash the mint and coriander leaves. Grind together ginger, garlic and green chilli, then add the leaves. Also added salt and lemon juice and grind it to a smooth paste. The green heaven is ready!


* Kneading the dough is very important since we are baking it. The end result will be flaky pastry wrap that is also tart like texture that crumbles and melts in your mouth.
* I forgot to add coriander leaves to the stuffing. Do add it if you have it.
* Replacing butter with half of ghee makes the end result of dough to be crumbly and perfect without adding a lot of ghee since that quantity of dough need at least 1/2 cup of ghee.
* Along with adding butter, we are kneading the dough using oil so that it helps in reducing the fat content to half of the original recipe.
* Make sure to flip the samosas after 15 minutes so that they can get baked evenly. Check if the samosas are done by tasting the thick side of the samosa. If it is crisp, it's time to stop baking.
* It is necessary to keep the dough covered at all times since it gets difficult to work with it if exposed to air. Dough hardens and makes it difficult to roll.


Do check out the tasty potato dishes that were put up by my fellow hoppers:

Vani's - http://marudhuskitchen.com/www/recipe-aloo-bhujia-potato-sevbateta-gathiya/#more-5693

Parvathy's -http://crackleandtemper.ca/rostii-swiss-potato-pancakes/

Jayashree's -http://www.evergreendishes.com/2016/08/10/frankie-potato-wrap/#more-2821

Padma's - http://www.masalakorb.com/chettinad-potato-roast-fry-urulai-varuval/

Shubha's -http://www.shubhaskitchen.com/2016/08/potato-pudding-aloo-halwa.html

Swati's - http://www.letscookhealthytonight.com/aloo-matar-parcel-samosa/

Piyali's - http://mytrystwithfoodandtravel.blogspot.ae/2016/08/bhapa-aloo-recipe-steamed-potatoes-in.html

Monday, July 11, 2016

Snowy Plover ~~Mocktail recipes

A bubbly caffeinated treat for an enjoyable get together or before a refreshing night out party,  Snowy Plover is a tasty coffee-based mocktail which is morning-friendly and can also replace your hot coffee!


It is time for yet another blog hop and oh! how the time flies! I hardly blog these days and though the reason for my absence is pretty personal, I do want to say that I miss blogging often and miss it more when I see those amazing posts from fellow bloggers. So, I decided to make sure that I post some for this blog hop. The theme for this month's blog hop is Mocktails. It was fun searching for a unique and easy mocktail that I can do, shoot and post in very little time that I have.

I came across this website when I was searching frantically for a mocktail long time ago when we stayed in Norway. We had bought some aromatic Coffee Arabica and wanted to make something different with it. Though it is a different kind of mocktail, it is not unusual and is actually very, very tasty. The brown sugar makes it tastier and believe me, It's heavenly.

I personally do not like mocktails and cocktails too sweet but if you do want them to be on the sweeter side, just inncrease the quantity of sugar in the coffee syrup. Also, it is best not to replace the sparkling water with anything else since that will overpower the coffee flavor. I have used my French press to make the coffee but you can use the normal filter or the coffee maker instead. Make sure you do not use the instant coffee powder, it might not taste as good.

Nutritional Information  (Approx) (per serving)
Energy  48.3 Calories
Fat 0.9 %
Carbohydrates 9.9 %
Dietary Fiber 0 %
Sodium 34.3 mg
Vitamin A 0.4 %
Vitamin C 0 %
Calcium  0.9 %
Iron  0.6 %
Protein 0.1 Grams
Sugar 8 Grams


Ingredients 
Coffee powder 1 tablespoon
Water (Boiling) 1/2 cup
Brown sugar 2 teaspoons
Sparkling water as needed
Ice cubes a few
Sweetened Whipped cream 1 scoop


Add Coffee powder and boiling water in your coffee maker or french press to get fresh coffee. Pour the fresh coffee over brown sugar to make the syrup. Let the syrup cool completely. You can also refrigerate it.


In a serving glass, add ice cubes and pour sparkling water over it till the glass is half filled. Pour the coffee syrup over the sparkling water and ice cubes to the full.


Top it up with the sweetened whipped cream, place a straw and serve. Enjoy!


* Add Vodka to make this a refreshing and tasty cocktail.
* Increase and decrease the quantity of brown sugar as per your taste.
* Top it with Vanilla ice cream for a filling and heavier version.
* Increase the amount of coffee powder in your french press to make the coffee syrup strong for stronger mocktail.
* You can make this decaff too.


Check out these links for amazing mocktails from my fellow culinary hoppers:


Marudhus Kitchen
http://marudhuskitchen.com/www/preparation-mocktail-spring-fever-mocktail-recipe/#more-5562

Anupama Nagarajakumar
http://easybitesonline.com/virgin-pina-colada-two-ways/
http://easybitesonline.com/virgin-berry-pina-colada/

Padma Veeranki
http://www.masalakorb.com/sea-breeze-mocktail-november-sea-breeze/
http://www.masalakorb.com/frozen-watermelon-slush-recipe-withlime/

Shubha Acharya
http://www.shubhaskitchen.com/2016/07/orange-glow-orange-juice-and-grenadine.html

Swati NeerajGoyal
http://www.letscookhealthytonight.com/cantaloupe-fizz-with-ginger-and-mint/

Jayashree Trao
http://www.evergreendishes.com/2016/07/12/coconut-cucumber-cooler/

Piyali Muthha
http://mytrystwithfoodandtravel.blogspot.ae/2016/07/strawberry-italian-cream-soda-mocktail.html

Thursday, June 23, 2016

Citrus White Sangria

A cool lemony drink for a refreshing party, White wine citrus Sangria is a delicious cocktail that can be made in minutes and with very few ingredients.


What better drink than a White wine citrus Sangria after a tired day of running behind your little one? I was thinking of having a drink for the evening anyway but then, I remembered that I could make a cocktail instead, to post for Parvathy's event. I was not a wine drinker myself till marriage but though it's been more than 5 years since the day I tasted wine for the first time, I have not felt like tasting any other alcoholic drink yet.

White wine Sangria also called as Sangria Blanca or Clerico is a refreshing sweet cocktail often made of White wine with thinly sliced fruits. The original Sangria is made of red wine but for me, White sangria tasted better than it's red version. Also, I found that we could mix both White and red wine to make it more interesting. Anyway,  when I foraged my fridge looking for anything that could go with the wine and club soda to make a cocktail, I found few lemons and sweet lime. I found this recipe which looked perfect so I quickly got to work.


I usually drink Madera which is fruity yet somewhat rejuvenating. I like my drinks less sweet and so, I have not added anything sweet to this recipe. I made just half of the pitcher and the drink tasted absolutely heavenly. Mr. Hegde loved it and said that I could make it more often. Poor thing, he has been having hard time avoiding his beer with all his dieting. Nevertheless, he liked the idea of a fruity cocktail instead of his strong pint of beer.

For this recipe, you can replace white wine with red wine and the club soda to any carbonated drink. Also, you can add few sprigs of mint to elevate the flavor. Cheers!!

Nutritional Information  (Approx) (per serving)
Energy  85 Calories
Fat 0 %
Carbohydrates 1 %
Dietary Fiber 0 %
Sodium 6.3 mg
Vitamin A 0 %
Vitamin C 0 %
Calcium  1.1 %
Iron  2.2 %
Protein 0.1 Grams
Sugar 0 Grams


Ingredients [Servings - 2 ]
White wine 250 ml
Club soda/ Lime soda 250 ml
Sweet lime 1 medium
Lemon 1 medium


Slice half of sweet lime and lemon into thin slices.


Squeeze the juice out of the remaining sweet lime and lemon. Put both the slices and the juices into a pitcher.


I have used Madera from Sula wines to make the Sangria. You can use any wine (Red or white)


Pour 250 ml of White wine and 250 ml of Club soda or lemon soda into the pitcher.


Check the taste and add any sweetener (sugar or honey) if you like it sweeter. Pour into a chilled glass and enjoy!


* You can dd few mint springs to enhance the flavor.
* Add sliced/chopped berries, peaches and mangoes for a fruity punch.

You might also like:

Related Posts Plugin for WordPress, Blogger...